
Enhancing Motor Design with User-Defined Slots in RMxprt
Welcome to our latest exploration into motor design optimization with RMxprt, where we delve into the critical role of slot dimensions in defining motor performance. Slot geometry is not merely a design detail—it is a cornerstone in achieving efficiency, effectiveness, and manufacturability in electric motors. In this blog, we will demonstrate how RMxprt's Slot Editor, an advanced tool designed for precise modifications, allows engineers to customize slot geometries. This capability enables users to fine-tune motor characteristics to meet specific performance criteria, from assembly ease to operational efficiency.
Slot Dimensions in Motor Design
Slot dimensions are pivotal in shaping the performance, efficiency, and manufacturability of electric motors. Each dimension serves specific functional purposes, influencing everything from assembly ease to operational efficiency. RMxprt provides an intuitive Slot Editor that simplifies the design and customization of these dimensions. This tool allows engineers to precisely adjust slot geometry to optimize electromagnetic performance, reduce material usage, and tailor slots to specific winding configurations. The editor's visual feedback and real-time validation support iterative design improvements, facilitating a streamlined development process that aligns with performance specifications and manufacturing capabilities.
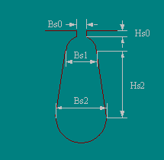
- Slot Opening Width (Bs0): The width of the slot opening, Bs0, directly affects the ease of winding wire insertion. A wider opening can simplify the manufacturing process, but an excessively wide opening might increase cogging torque and acoustic noise. Conversely, reducing Bs0 can diminish leakage flux around the slot opening, enhancing the electromagnetic efficiency of the motor.
-
Slot Width at the Bottom (Bs1): This dimension is crucial for securing the winding wire once it is inserted. Bs1 is typically narrower than the opening, affecting how much copper wire can be packed into the slot, which in turn impacts the motor's current-carrying capacity and torque generation. A larger Bs1 allows for more copper and higher fill factors, potentially boosting torque and power output.
-
Slot Depth (Hs2): Hs2 measures the depth of the slot from its top to the bottom, influencing the magnetic path length and the quantity of iron in the stator teeth. Deeper slots can accommodate more winding turns to increase torque; however, they may also raise the magnetic reluctance of the stator, potentially reducing efficiency.
-
Slot Opening Height (Hs0 and Hs1): Hs0 and Hs1, the heights at and just below the slot opening, respectively, are critical for controlling how magnetic flux enters and exits the slot. Optimizing these dimensions helps balance ease of winding with minimal impact on the motor's magnetic circuit, influencing eddy current losses and the distribution of magnetic flux within the stator.
Impact of Slot Dimensions on Motor Design:
- Electromagnetic Properties: Slot dimensions affect the flux density distribution within the stator core, which alters the induced electromotive force (EMF) and the motor’s back-EMF profile.
- Thermal Behavior: A higher fill factor from more copper in the slots leads to increased losses and elevated thermal stress. Slot design must therefore accommodate adequate heat dissipation and cooling strategies.
- Cogging and Torque Ripple: Properly designed slot dimensions can significantly reduce cogging torque and torque ripple, enhancing the motor's operational smoothness.
- Manufacturability and Cost: While easier winding processes and reduced material usage can lower manufacturing costs, they must be balanced against potential compromises in motor performance.
These dimensions play a critical role in the overall design and functionality of electric motors, impacting their efficiency, performance, and manufacturability.
Accessing the Slot Editor
The Slot Editor is easily accessible and provides a user-friendly interface for creating and modifying slot geometries: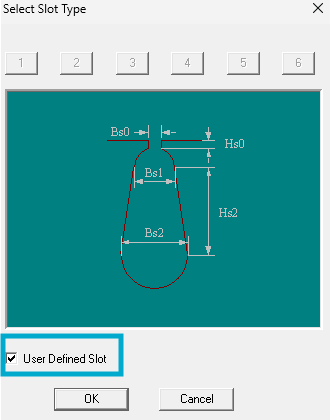
-
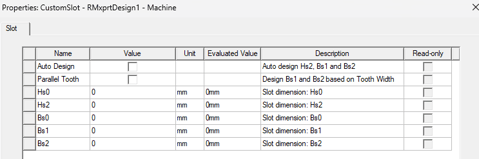
Navigating to the Slot Editor: The Slot Editor automatically appears when you select 'User Defined Slot' within your project. This selection can typically be made in the motor design workflow where you define stator or rotor configurations.
Converting Standard Slots to User-Defined Slots
To customize a slot, you first need to convert an existing standard slot into a user-defined slot:
-
Choose Basic Slot Shape: In the Slot Type window, choose the rotor or stator for which you want to modify the slot.
-
Enable User Definition: In the dialog, check the 'User Defined Slot' option and confirm by clicking 'OK'.
This changes the slot label in the project tree to one of the following, depending on the original slot type:
UserDefSymmetricSlotUserDefUnsymmetricSlotUserDefHalfSlot
Working with the Slot Editor Window
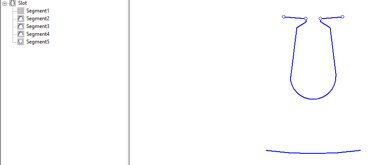
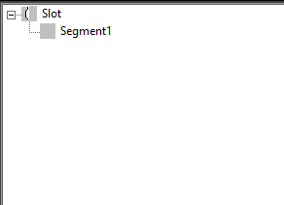
Once a slot is set to user-defined, the Slot Editor window provides two main views:
-
Data Editing View: Displays a tree view of the slot and its segments.
-
Graphical View: Shows a visual representation of the slot geometry.
The RMxprt Slot Editor is a comprehensive tool that allows for intricate editing of slot segments, which form the detailed geometry of stator or rotor slots in motor designs. Here’s how you can leverage its features to refine your slot design:
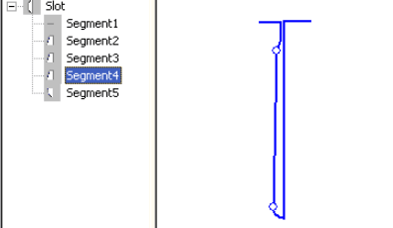
Accessing Segment Editing Options
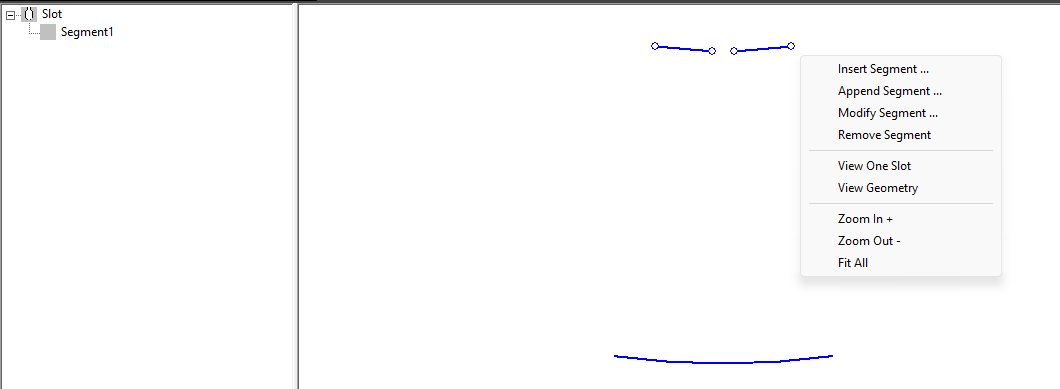
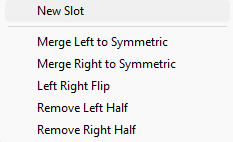
- Contextual Menu Actions: Right-clicking on a slot segment in the tree view or directly in the graphical view opens a context menu. This menu offers several commands:
- Insert Segment: Adds a new segment before the selected segment. Note that inserting before the first segment (Segment1) is not permitted.
- Append Segment: Adds a new segment after the selected segment, expanding the slot design downward.
- Modify Segment: Opens the segment for modification, where you can adjust its dimensions and shape.
- Remove Segment: Deletes the selected segment. Adjacent segments are automatically connected to maintain slot integrity. Segment1, however, cannot be removed.
Detailed Segment Customization
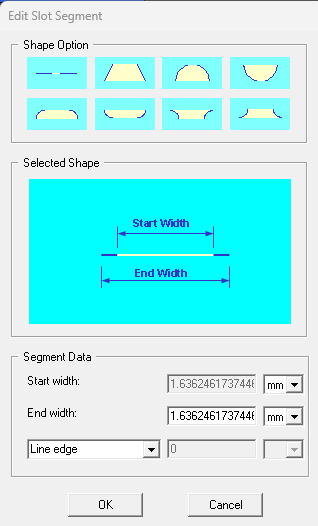
- Edit Slot Segment Dialog Box: When you choose to insert, append, or modify a segment, the Edit Slot Segment dialog box appears. This interface allows you to define the segment’s geometry comprehensively:
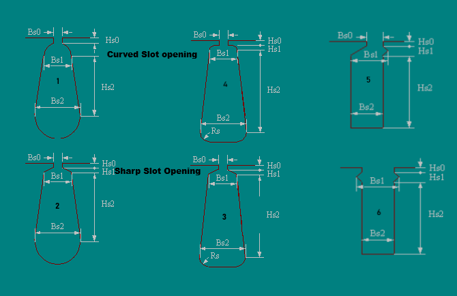
- Shape Selection: Eight basic geometric shapes are available, such as rectangular, trapezoidal, and curved shapes. Each shape modifies the slot’s characteristics differently, impacting the magnetic performance and physical assembly of the motor.
- Dimensional Parameters: You can specify the height, starting and ending widths, and radius for each segment. These parameters are crucial for tailoring the flux distribution and ensuring the mechanical compatibility of the windings with the slot.
Advanced Editing Features
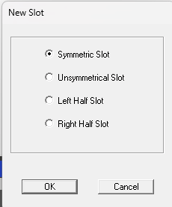
Before defining a user-defined slot in RMxprt, you must first select the basic slot type that will form the basis of your customization. This initial selection significantly influences the structural foundation of the slot you intend to customize.
- Symmetric Slots: These are mirror images on either side of the slot axis, ideal for uniform magnetic fields and straightforward design needs.
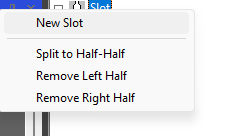
- Antisymmetric Slots: Independent editing of left and right slot sides allows for detailed customization of each half.
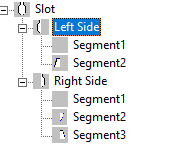
- Half Slots: Provides editing capabilities for single-side slot geometries.
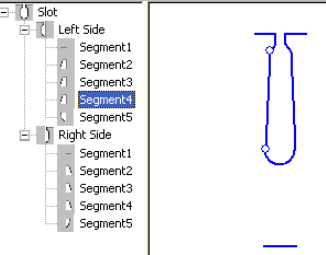
Finalizing Slot Design
After making all necessary modifications, reviewing the slot design in the graphical view ensures that all parameters are correctly set. Changes in the Slot Editor immediately update the main project view, reflecting how the slot modifications affect the overall motor design.
Conclusion
The Slot Editor in RMxprt not only enhances the precision of motor slot design but also significantly impacts the motor’s performance by allowing detailed customization of slot dimensions and shapes. This tool is essential for engineers looking to optimize motor designs for specific operational conditions.