
![]()
In this article, I will introduce you to PyAEDT, the Python library designed to enhance your experience with the Ansys Electronics Desktop, or AEDT. PyAEDT simplifies scripting by interacting directly with the AEDT API, allowing for seamless integration across Ansys’s comprehensive suite of electromagnetic, thermal, and mechanical solvers. By harnessing the power of PyAEDT, you can take your analysis to the next level, such as by extracting field information directly from mesh nodes or creating custom core loss models, opening up new dimensions in simulation accuracy and customization.
Be sure to check out the accompanying YouTube video for this blog, which delves deeper into this topic. The video guides you through downloading and installing PyAEDT, running it in a Jupyter notebook, and explores several additional details:
Understanding PyAEDT and Python Environments in Ansys Electronics Desktop
-
PyANSYS and PyAEDT: PyANSYS is a comprehensive Python library that enables scripting and automation across various Ansys applications. PyAEDT is a specialized subset focused on Ansys Electronics Desktop, designed to streamline tasks in electromagnetic, thermal, and mechanical analysis through direct API interactions.
-
IronPython in AEDT: IronPython is a Python implementation that integrates with the .NET framework, allowing scripts to interact directly with AEDT. It's ideal for running scripts within the AEDT environment, providing seamless access to Ansys features, though it may not support some external Python libraries due to its .NET alignment.
-
CPython with AEDT: CPython is the standard Python interpreter known for its extensive support of scientific and engineering libraries. For AEDT, CPython is typically used for external scripting, enabling complex data processing and visualization tasks with libraries like numpy, scipy, and matplotlib.
-
Choosing the Right Environment: The choice between IronPython and CPython depends on the specific requirements of your project. IronPython offers direct integration within AEDT, making it suitable for straightforward scripting tasks. In contrast, CPython is preferable for tasks requiring intensive data analysis or the use of extensive Python libraries outside the .NET framework.
Activating a Control Program in Maxwell Transient Solutions
Control programs in Maxwell are powerful scripts or executables that can dramatically extend the functionality of your simulations by interacting directly with each timestep of the solver. Whether you're working with Maxwell 2D or 3D, these programs can modify source inputs, adjust circuit elements, control mechanical quantities, and even redefine stopping criteria based on real-time solution updates. This capability is particularly useful for applications like custom core loss calculations where you need precise control over the simulation process.
Here’s how you can specify and use a control program in your Maxwell transient solver setup:
-
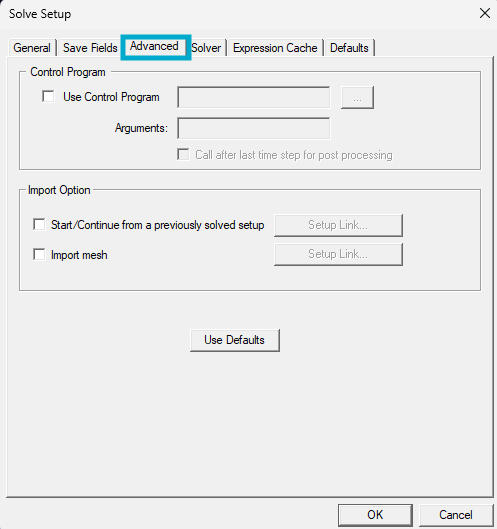
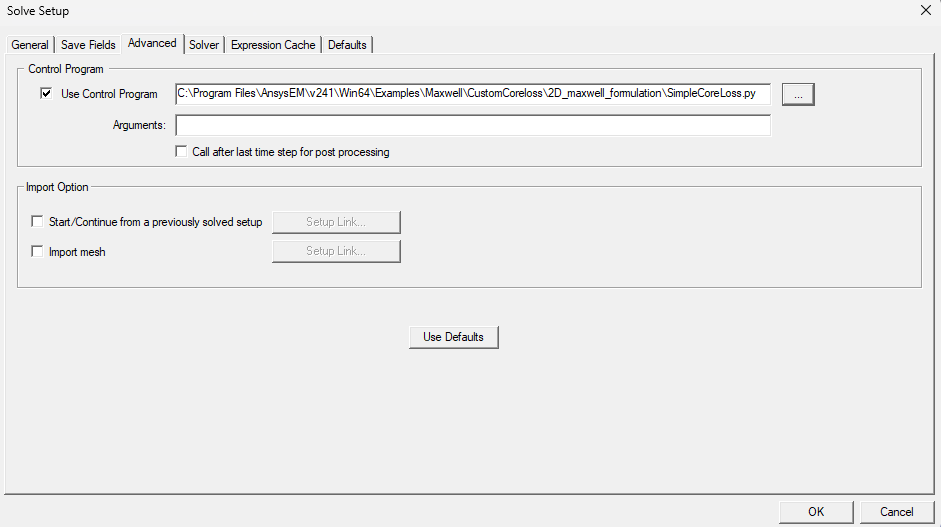
Enable the Control Program: In the Solve Setup dialog box, check the Use Control Program box to activate the field where you can enter the name of your control program.
-
Select Your Program: Click the ... button to open a file selection dialog. Navigate to the location of your control program, which can be a Python script (.py) or an executable file (.exe), and select it.
-
Configure Program Arguments: In the Arguments text box within the Solve Setup dialog, enter any arguments your control program requires. Maxwell calls your control program with these arguments formatted as
program_name specified_arguments. For Python scripts, arguments can include the--postflag if the script should execute post-processing after the last timestep.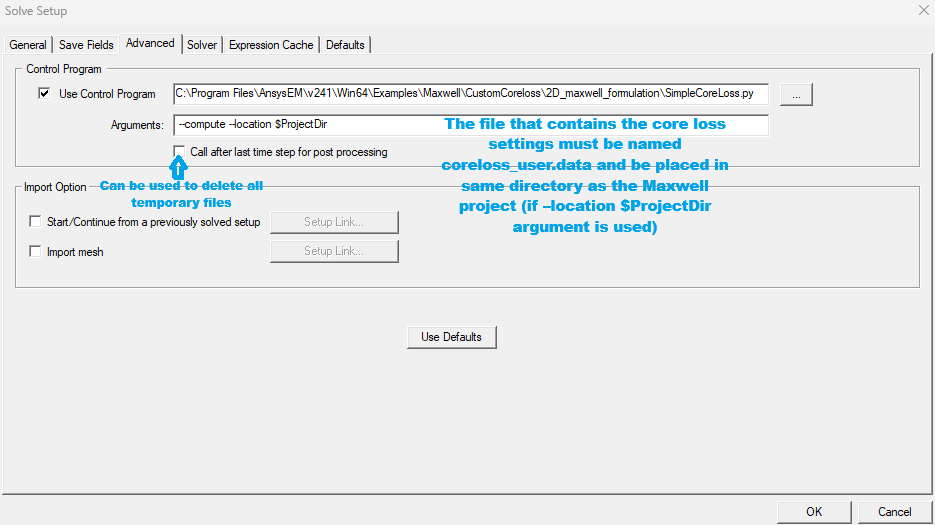
-
Post-Processing Option: If your simulation requires running the control program after the final timestep for post-processing (such as for final state analysis or additional calculations), select the Call after last timestep for post processing checkbox. For Python scripts, use
--postas the flag, and for compiled programs, use-post. -
Apply Settings: Click OK to apply these settings and return to the main Solve Setup window
Integrating a Control Program in Maxwell 2D with PyAEDT
Introducing automation into Maxwell 2D projects through control programs can significantly enhance the efficiency and precision of your electromagnetic simulations. Using PyAEDT, a Python library tailored for Ansys Electronics Desktop, you can automate various aspects of your simulation process from geometry creation to post-processing. This example will guide you through setting up a control program in Maxwell 2D, leveraging PyAEDT's robust capabilities.
1. Import Necessary Modules: Begin by importing the required Python modules from PyAEDT which facilitate file handling, unique folder generation, and interaction with Maxwell 2D:
from pyaedt import downloads
from pyaedt import generate_unique_folder_name
from pyaedt import Maxwell2d
2. Configure AEDT Version and Mode: Specify the version of AEDT you're working with and whether to run it in graphical or non-graphical mode, depending on your computational preferences or system capabilities
aedt_version = "2024.1"
non_graphical = False
3. Prepare the Environment: Set up a temporary folder to store your project files, and download necessary .aedt and Python script files:
temp_folder = generate_unique_folder_name()
aedt_file = downloads.download_file("maxwell_ctrl_prg", "ControlProgramDemo.aedt", temp_folder)
ctrl_prg_file = downloads.download_file("maxwell_ctrl_prg", "timestep_only.py", temp_folder)
4. Launch Maxwell 2D: Initialize Maxwell 2D with the specified version and session settings:
m2d = Maxwell2d(projectname=aedt_file,
                specified_version=aedt_version,
                new_desktop_session=True,
                non_graphical=non_graphical)
5. Activate Your Design: Choose the design in Maxwell 2D that will utilize the control program:
m2d.set_active_design("1 time step control")
6. Setup the Control Program: Link your control program to the active design setup, passing the path to your Python script or executable:
setup.enable_control_program(control_program_path=ctrl_prg_file)
7. Execute the Simulation: Run the simulation using the specified setup:
setup.analyze()
8. Post-Processing: Generate plots from the simulation results, such as field line traces, to visualize electromagnetic behaviors over time:
sols = m2d.post.get_solution_data("FluxLinkage(Winding1)", variations={"Time": ["All"]}, primary_sweep_variable="Time")
sols.plot()

9. Finalize and Close: Once your simulations and analyses are complete, ensure to save your project and properly release the AEDT session:
m2d.save_project()
m2d.release_desktop()
By integrating a control program into your Maxwell 2D project using PyAEDT, you unlock a higher level of automation and precision in your electromagnetic simulation tasks. This setup not only streamlines repetitive tasks but also opens up new possibilities for custom post-processing and advanced simulation control strategies